The Ultimate Beginner’s Guide to Epoxy Resin Art in Kenya (2026)
The Ultimate Beginner’s Guide to Epoxy Resin Art in Kenya
Epoxy resin art is quickly emerging as one of the most exciting creative and commercial opportunities in Kenya. From glossy coasters and customized keychains to stunning ocean-themed serving trays and live-edge river tables, resin allows you to transform liquid liquids into crystal-clear, durable, high-gloss masterpieces.
Whether you want to start a high-margin craft business or simply explore a new creative hobby, this guide covers everything you need to know to get started safely and successfully right here in Kenya.
1. What is Epoxy Resin?
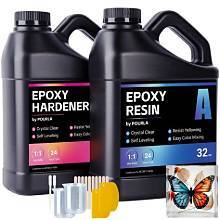
Epoxy resin is a two-part liquid system consisting of:
- Part A (Resin): The base chemical liquid.
- Part B (Hardener): The chemical curing agent.
When Part A and Part B are combined in the exact manufacturer-specified ratio, a chemical reaction occurs. This exothermic reaction generates heat and transforms the liquid mixture into a hard, glossy, glass-like plastic over several hours.
Common Types of Craft Resin in Kenya
- 1:1 Craft / Coating Resin: Mixed in equal parts by volume. It has a thicker viscosity, cures faster (12–24 hours), and is ideal for thin pours up to 0.5 cm, such as coasters, bookmarks, jewelry, and topcoats.
- 3:1 or 2:1 Deep-Pour Resin: Mixed by weight or volume depending on the brand. It has a thinner, water-like consistency and cures much slower (48–72 hours). Perfect for deep molds, river tables, and thick castings (up to 2–5 cm per layer).
2. Essential Personal Safety & Workspace Setup
Working with epoxy resin involves chemical reactions that emit invisible fumes (volatile organic compounds or VOCs). Safety must be your top priority from day one.
Personal Protective Equipment (PPE) Checklist
- Respirator Mask: Use an organic vapor respirator mask (dual-filter). Standard cloth or dust masks do not block chemical VOC fumes.
- Nitrile Gloves: Standard latex gloves degrade quickly when exposed to chemicals. Use nitrile gloves to prevent skin contact and resin dermatitis.
- Safety Goggles: Protect your eyes from accidental splashes during vigorous stirring.
- Clothing: Wear old long-sleeved clothing or a plastic apron to safeguard your skin.
Preparing Your Workspace
- Ventilation: Work in a well-ventilated room with open windows, or outdoors in a shaded area.
- Level Surface: Resin is self-leveling. If your work table is slightly tilted, your finished pieces will cure unevenly. Use a simple spirit level app on your phone.
- Dust Control: Cover your work area with plastic sheeting or silicone mats. Dust particles, hair, and insects are your worst enemies while resin is wet. Keep a clean cardboard box or plastic bin handy to cover wet projects while they cure.
3. Step-by-Step Instructions: Your First Resin Project
1.Gather Equipment & Measure Accurately:
Exact ratios are required for a proper chemical cure.
Clean your silicone mold using isopropyl alcohol or mild dish soap and dry completely. Place your silicone measuring cups on a flat table. Read your resin bottle label carefully to confirm whether the ratio is by volume (milliliters) or by weight (grams). Pour Part A first, followed by the exact proportion of Part B.
2.Stir Slowly & Thoroughly:
Spend 3 to 5 full minutes stirring to prevent uncured sticky spots.
Stir the mixture steadily with a wooden spatula or silicone stir stick. Scrape the sides and bottom of your mixing cup repeatedly. Stirring too fast whips air into the mixture, creating hundreds of micro-bubbles; aim for a slow, consistent motion.
3.Add Pigments & Inks:
Keep additives under 10% of total volume.
Divide your mixed clear resin into smaller cups if using multiple colors. Add a tiny drop of alcohol ink, a toothpick tip of mica powder, or specialized resin paste. Mix thoroughly.
Note: Avoid water-based acrylic paints, as water reacts negatively with epoxy.
4.Pour into Molds & Demold:
Allow 24 hours of undisturbed curing time.
Slowly pour the resin into your silicone mold from a low height to minimize air bubbles. Pass a mini heat gun or butane torch lightly 5-10 cm above the surface to pop rising surface bubbles (never hold heat in one spot). Cover with a clean box and leave undisturbed at room temperature (22 to 28 degrees Centigrade) for 24 hours before gently peeling back the mold.
4. Top 5 Beginner Mistakes & How to Avoid Them
| Mistake | What Happens | The Fix |
| Incorrect Mixing Ratio | Resin remains sticky, tacky, or bendable forever. | Use precise measuring cups or digital scales. Never eyeball measurements. |
| Under-Stirring | Patchy, wet spots on your cured art. | Stir for a minimum of 3 full minutes, scraping cup walls constantly. |
| Using High Humidity/Cold Space | Amine blush (a greasy/cloudy surface film). | Avoid pouring outdoors on rainy days in Kenya. Work in warm rooms above $20^\circ\text{C}$. |
| Overheating with Torch | Resin scorches, yellowing occurs, or silicone mold fuses to the resin. | Keep the heat gun/torch moving continuously. Spend no more than 1–2 seconds per area. |
| Adding Water-Based Dye | Soft cure, bubbling, or complete failure to harden. | Use oil/powder-based pigments, mica powders, or specialized resin inks only. |