How to Build a Hydroponic Structure in Kenya: Materials, Costs & Setup
How to Build a Hydroponic Structure in Kenya: Materials, Costs & Setup
Building a protected farming structure is the bridge between a home experimental kit and a resilient commercial farm. In Kenya's varied climate, from the hot lowlands of Eastern and Coastal regions to the chilly high altitudes of Nyandarua and Eldoret, a structure shields your hydroponic system from heavy downpours, scorching UV heat, insect vectors, and hail.
Constructing a hydroponic unit does not require expensive imported equipment. You can assemble a high-yielding, weather-resistant shadehouse or greenhouse using locally sourced timber, PVC pipes, UV-stabilized polythene, and insect netting.
Here is a practical, step-by-step guide to designing, costing, and building a standard 8m × 15m (120 square meter) hydroponic structure in Kenya.
1. Shadehouse vs. Greenhouse: Choosing the Right Structure
| Feature | Low-Cost Shadehouse | UV Polythene Greenhouse |
| Best Suited Climate | Warm/hot regions (Coast, Kitui, Machakos, Kajiado, Garissa) | Cold/moderate high-altitude regions (Kiambu, Rift Valley, Nyeri) |
| Covering Material | 50% Shade Net top + Insect Net sides | 200-Micron UV-Treated Polythene sheet top + Insect Net sides |
| Temperature Control | High airflow; cools roots in hot weather | Retains thermal heat; accelerates growth in cold areas |
| Cost Range (8m × 15m) | KES 90,000 – KES 130,000 | KES 140,000 – KES 240,000 |
2. Complete Material & Cost Breakdown (8m × 15m Wooden Frame Setup)
Using treated cypress or eucalyptus timber offers the best balance of cost and durability for small-to-medium setups, lasting 5 to 8 years when properly anchored in concrete footings.
Structural & Frame Materials Cost Sheet
| Material Item | Specifications / Details | Quantity Needed | Estimated Cost Range (KES) |
| Treated Wooden Poles | 4-inch diameter cypress/eucalyptus (treated with creosote/engine oil) | 35 poles (4-meter height) | KES 21,000 – KES 28,000 |
| Timber Pur lins & Rafters | 2" × 2" and 2" × 4" treated cypress timber | 60 pieces (18-foot lengths) | KES 18,000 – KES 24,000 |
| UV Polythene Sheet | 200-micron clear film (UV-stabilized, anti-drip) | 1 roll (8m width specs) | KES 28,000 – KES 35,000 |
| Insect Netting | 50-mesh anti-insect side net | 60 meters | KES 12,000 – KES 16,000 |
| Concrete & Anchors | Cement (Simba/Bamburi), sand, and ballast aggregate | 6 bags cement + load sand/ballast | KES 12,000 – KES 15,000 |
| Wiggle Wire & Profile Channels | Aluminum profile channels + zigzag lock wire (for tensioning sheets) | 150 meters | KES 15,000 – KES 20,000 |
| Hardware & Fasteners | Screws, 4" nails, U-staples, binding wire, corner brackets | Bulk assorted kit | KES 6,000 – KES 9,000 |
| Labor & Installation | Carpenter / local greenhouse assembly crew | 4 to 6 working days | KES 25,000 – KES 35,000 |
| TOTAL ESTIMATED FRAME COST | Standard Wooden Structure (120 m² Footprint) | — | KES 137,000 – KES 182,000 |
Note: Upgrading from a wooden structure to a galvanized steel frame increases the total structure investment to approximately KES 230,000 – KES 290,000 for the same 120 m² size.
3. Plumbing & Hydroponic System Assembly (NFT & Substrate Drip)
Once the outer structure is framed and roofed, you can install your interior growing lines.
Material Requirements for a 1,000-Plant NFT Leafy Green Setup
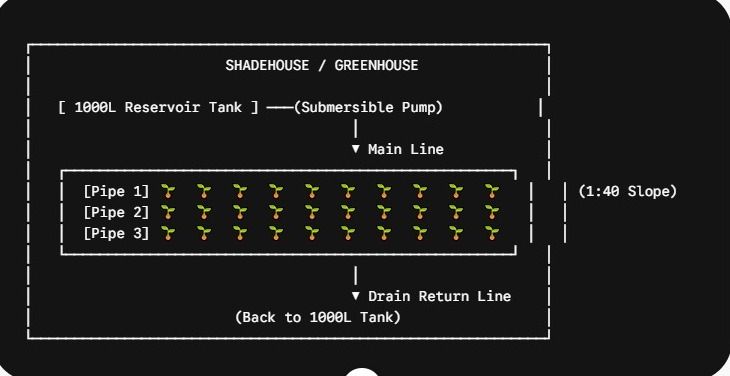
- PVC Channels: Use 4-inch heavy-gauge class 41 PVC pipes. Drill 2-inch holes spaced 18–20 cm apart along the top face using a hole saw drill bit.
- Channel Gradient Slope: Mount pipes on timber A-frames or flat horizontal racks with a 1:40 slope (a 2.5 cm drop for every 1 meter of pipe length). This ensures the water continuously moves without pooling.
- Water Tank Reservoir: A 1,000-Liter dark opaque plastic tank (e.g., Roto Tank) placed below floor level or shaded to prevent internal algae growth.
- Pumping System: A 45W to 85W submersible fountain or solar-powered pump capable of continuously circulating water at 1 to 2 liters per minute per line.
4. Step-by-Step Construction Guide
1.Site Orientation and Foundation Footings:
Orient North-to-South for uniform sunlight exposure.
Clear the ground completely. Mark out your 8m × 15m perimeter. Dig 3-foot deep post holes spaced 2.5 meters apart along the sides. Set your 4-inch treated timber poles into the holes, level them vertically using a plumb line, and pour concrete (cement, sand, ballast mix) into the holes. Allow 48 hours for the concrete to set firmly.
2.Framing Roof Arches and Pur lins:
Ensure proper pitch angle for rainwater runoff.
Mount 2" × 4" roof rafters or bend 1-inch galvanized steel pipes into overhead hoops across the width. Connect the roof arches along the ridge using 2" × 2" timber pur lins. Sand all top surfaces touching the plastic sheet to prevent sharp splinters from puncturing the film over time.
3.Attaching UV Sheet, Netting, and Wiggle Wire:
Stretch materials tightly to resist high wind pressure.
Secure the aluminum profile channels along the top side beams using tapping screws. Drape the 200-micron UV sheet over the roof frame, pulling it taut on both sides. Insert the zigzag wiggle wire into the aluminum channels to lock the plastic tightly without puncturing it. Cover the side walls with 50-mesh insect netting.
4.Plumbing Installation and Leak Check:
Run test cycles with clean water before introducing nutrients.
Position your PVC channels on the slope racks. Connect the main delivery hose from your submersible pump inside the 1,000L tank up to the top end of each pipe. Install return drain headers at the lower end of the channels to direct water back to the tank. Run the pump for 30 minutes with plain water to inspect all glue joints, grommets, and slopes for leaks.
5. Critical Pitfalls to Avoid in Construction
- Incorrect Channel Gradient: Setting pipes completely flat causes water to pool, leading to oxygen deprivation, root rot, and slow plant growth. Always confirm your 1:40 drop with a torpedo spirit level.
- Using Transparent Tanks: If sunlight penetrates your water reservoir tank, algae will multiply rapidly, stealing nutrients and clogging pump impellers. Always use dark blue, black, or shaded tanks.
- Skipping Insect Netting: Omitting side netting exposes your crops to whiteflies and thrips, which transmit viruses. Always seal structure perimeters securely with anti-insect netting.