Rainbow Rooster Brooding & Housing Guide Kenya | Part 2 Setup
Rainbow Rooster Housing, Brooding & Early Chick Management: The First 30 Days
The first 30 days of a Rainbow Rooster's life determine its growth potential and final market weight. A common phrase among experienced poultry farmers in Kenya is "How you brood is how you harvest." Stunted growth during the brooding stage cannot be reversed in later weeks, regardless of how much feed you offer.
In Part 2 of our Rainbow Rooster series, we cover poultry house design, brooding ring setup, temperature management, and bio-security protocols to maintain a flock mortality rate below 3%.
1. Housing Requirements for Rainbow Roosters
Rainbow Roosters are resilient, but proper house construction protects them from harsh weather, draft currents, predators, and disease accumulation.
Key Structural Specifications
- Orientation: Build the chicken house running East-to-West. This prevents direct sunlight from blinding or overheating the birds during early morning and late afternoon hours.
- Floor Space Standard:
- Deep Litter (Confined): Allow 1.5 to 2.0 square feet per bird for adult roosters. For 100 birds, a house measuring 10 ft × 15 ft (150 sq ft) is optimal.
- Semi-Intensive (Free-Range Access): Allow 1 square foot per bird indoors, provided they have access to an outside run.
- Wall Design: Build solid masonry walls (stone/timber/iron sheets) up to 3 feet from the ground, followed by wire mesh (kuku mesh) up to the roof line for cross-ventilation.
- Curtains: Hang heavy canvas, gunny bags, or durable polythene sheets over the wire mesh to cover the windows during brooding and cold nights.
2. Setting Up the Brooding Ring (Pre-Arrival Checklist)
Day-old chicks cannot regulate their own body temperature for the first two to three weeks. A brooding ring concentrates heat, feed, and water within a warm zone.

- Ring Material: Use hardboard or cardboard guards placed in a circular shape (4 to 6 feet in diameter for 100 chicks). Avoid square corners where chicks can crowd, suffocate, or crush each other.
- Bedding Material: Spread 2 to 3 inches of clean, dry wood shavings over a concrete or earth floor. Avoid using fine sawdust, as young chicks mistake fine particles for feed and suffer gizzard blockage.
- Heat Source Options:
- Infrared Heat Bulbs: One 175W or 250W bulb is sufficient for 100–150 chicks.
- Charcoal Jiko: Place a charcoal stove inside a metal box or surrounded by wire mesh to avoid burns and carbon monoxide buildup. Ensure adequate ventilation.
- Gas Brooders: Efficient for larger commercial flocks ($250\text{+ chicks}$).
3. Brooding Temperature & Chick Behavior
Rather than relying solely on a thermometer, observe chick behavior to gauge whether heat levels are correct:
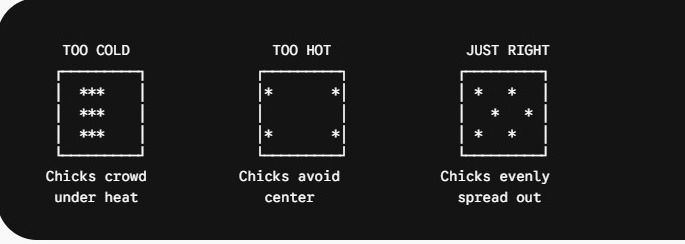
| Chick Behavior | Diagnosis | Corrective Action |
| Huddled directly under heat source, chirping loudly | Too Cold | Lower the lamp or add heat. |
| Pushed far against the perimeter ring, panting | Too Hot | Raise the lamp or reduce charcoal. |
| Crowded to one side of the ring | Cold Draft Current | Check curtains for wind leaks. |
| Evenly distributed, active, feeding, and resting | Ideal Temperature | Maintain current setup. |
Temperature Management Timeline
- Week 1 (Days 1–7): 32 - 35 degrees Centigrade
- Week 2 (Days 8–14): 29 - 31 Degrees Centigrade (Expand brooding ring)
- Week 3 (Days 15–21): 26 - 28 Degrees Centigrade (Begin weaning off heat during the day)
- Week 4 (Days 22–28): Ambient room temperature (22 - 24 Degrees Centigrade)
4. Day 1 Intake Protocol
Upon receiving day-old chicks from the hatchery:
- Hydration First: Do not offer solid feed immediately. Offer warm water mixed with Glucose or Liquid Paraffin (or Stresspack/Electrolytes) for the first 2 to 4 hours to rehydrate chicks after transport.
- Introduce Feed: After 2 hours of drinking, introduce Chick Starter Crumbs on clean newspaper sheets spread over the wood shavings. This helps chicks locate feed easily.
- Transition to Feeders: By Day 3, move feed onto small tray feeders, and gradually introduce linear or cylindrical chick feeders by Day 7.
5. First-Month Bio-Security Checklist
- Footbath: Place a plastic tray filled with water and disinfectant (e.g., Omniclean, Vircocid) at the house entrance.
- Daily Cleaning: Wash and sanitize drinker bottles every morning before refilling with fresh water.
- Litter Management: Turn wood shavings twice a week to keep the bed dry and prevent ammonia build-up, which causes respiratory infections.
What’s Next in the Series?
Now that your house is built and brooding protocols are established, optimal feeding becomes the key factor driving performance.
In Part 3 of this series, we will present the Complete 12-Week Rainbow Rooster Feeding Matrix, covering feed conversion ratios, safe cost-cutting strategies (Azolla & BSF), and why dairy meal must be avoided.